|
Adding the component to a Windows Forms project (.NET 5, 6 and Core 3.1) |
  
|
|
Adding the component to a Windows Forms project (.NET 5, 6 and Core 3.1) |
  
|
Here follows some topic of interest to help you using the product:
Editing control properties at Design-time
Editing control properties through the 3D Button Visual Editor application
Editing multiple controls at once
After having installed the component inside the development PC through our setup program, you can add the component to a project targeting .NET 5, 6 and Core 3.1 versions by installing the proper NuGet package using the procedure described below:
| • | Open the project you are working on |
| • | Inside the "Solution Explorer" right-click the mouse button on the "Dependencies" item |
| • | From the context menu open the NuGet Package Manager by selecting the "Manage NuGet Packages ..." item |
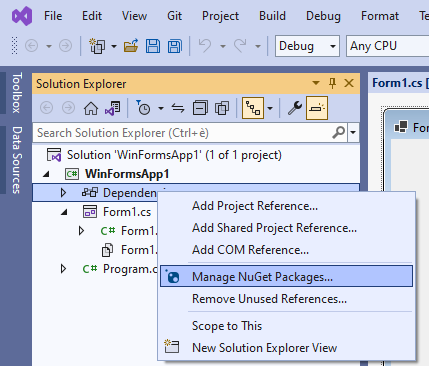
| • | By default the NuGet Package Manager will browse packages available on the nuget.org server; although trial versions of our NuGet packages are available inside nuget.org, it's recommended using packages available inside the folder in which you installed any of our components: the default folder is "\Program Files\MultiMedia Soft" so you need to set the mentioned folder as a packages source through the NuGet Package Manager settings |

| • | On the settings form, select the "+" icon |

| • | A new default "Package source" is a automatically added as seen below |

| • | On the "Name" field enter a string that would help identifying the source (we suggest entering "MultiMedia Soft Packages") |
| • | Click the "..." button and enter the path where our NuGet packages are installed (by default it should be "\Program Files\MultiMedia Soft\NugetPacks") |
| • | By clicking the "Update" button the form should finally look like this: |

| • | Close the form by pressing the "OK" button |
| • | The new source could now be selected through the provided combo-box |

| • | Once selected, after clicking the "Browse" tab, all of the MultiMedia Soft NuGet packages installed on the development machine will be displayed (in this case a Trial version of the component) |
| • | In order to install the package inside the project, move the mouse of the right of the displayed version (circled in red below): this will cause an arrow to appear (circled in purple below): |

| • | Click the arrow in order to start the installation procedure |
| • | Once the installation procedure is completed, close the NuGet package manager |
| • | Open the form that will contain the component |
| • | Open the "Toolbox" and verify that all of the controls installed by the package are displayed as seen inside the screenshot below, referring to a project created by targeting to .NET Core 3.1: |

| • | At this point the component is installed and you can start dragging available controls into the container form; by default a 3D push button will look like the one below: |

The tutorial above is mostly related to the installation of the Trial version of the component; in case you should have already begun developing your application with the Trial version and at a certain extent you should decide to purchase the "Full" version, you would not have to restart your coding from scratch and you could simply upgrade using the appropriate NuGet package; below a simple sequence to perform this upgrade:
| • | Close any instance of Visual Studio |
| • | Uninstall the setup package of the Trial version from the "Apps" applet of the Windows settings |
| • | Download and install the Full version from our website using provided URL and credentials |
| • | Launch Visual Studio and open the project you were working on |
| • | Be sure to close the form containing the component |
| • | Inside the "Solution Explorer" expand the "Dependencies/Packages" item |
| • | Right click the "3dControlMagic.Trial" item and select the "Remove" menu item as seen below: |

| • | As explained above for the Trial version, open again the NuGet Package Manager and select the "MultiMedia Soft packages" source |
| • | Press the arrow for installing the Full version and finally close the NuGet Package Manager |

| • | The upgrade is now completed so you can go on with your development. |
Editing control properties at Design-time
Versions of the .NET Framework from 2 to 4 allow various ways to edit a component at design-time: unfortunately most of these ways (described inside the previous tutorial Adding the component to a Windows Forms project (.NET Frameworks from 2 to 4, like adding verbs to the context menu or adding links inside the properties panel, are no more available for .NET 5 and newer version.
Obviously you can still change properties using the the classical VS.NET "Properties" panel:

From this VS.NET panel you have access to all of the control available properties: simply scroll the left vertical scroll bar to reach the property you need to change.
As you will see, scrolling down the scrollbar you will find some property with a "+" sign on its left side: this means that this property contains a set of sub-properties: clicking the "+" sign will cause the
property to be expanded giving you access to the sub-properties as in the example below:

Editing control properties through the 3D Button Visual Editor application
Note: this feature is not available for the Ctl3dFormShaper control.
When editing a control at Design-time, you must take care of setting up the properties that will influence the control behaviour at Runtime in the various states the control could have: for example, our 3D buttons can change their surface color or the picture displayed on their surface when pressed or when the mouse is over the button area: usually, in order to see these effects, you will have to compile and run your projects in order to see if the settings made at Design-time are correct for your needs: with our component we have found the right solution to let you see, at Design-time, the behaviour the control will have at Runtime: the solution is the integration of this component with our 3D Button Visual Editor application.
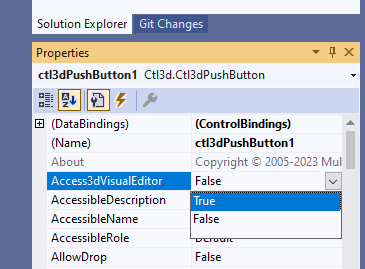
As mentioned on the previous section, with .NET 5 and newer versions available editing features of components at design time are quite limited so we had to find a sort of bridge for allowing the possibility to integrate the 3D Button Visual Editor application within Visual Studio. In order to launch this application you must locate the Access3dVisualEditor property inside the "Properties" window and change its value from "False" to "True":
3D Button Visual Editor is a WYSIWYG application we have developed for creating 3D buttons pictures: as you can see on the image below, its user interface is very friendly and doesn't require any particular skill: clicking the button under editing will show how the control will behave at runtime and, in the same way, if you have setup some "mouse over" behaviour, also know as "Rollover", for example a surface color change, you will have the possibility to test it by simply entering the mouse cursor over the button surface.
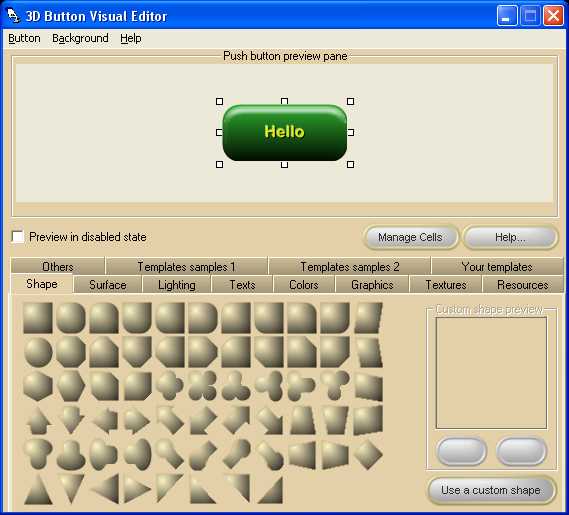
After having edited the button with your preferred settings, you can save or discard the new button's settings closing the application.
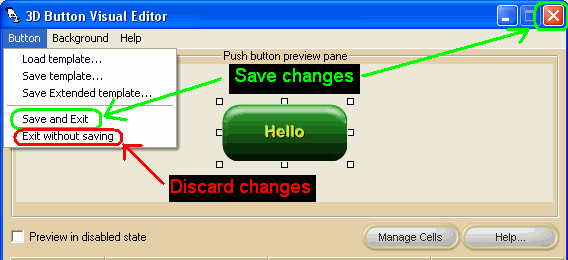
As you can see on the image above, from inside 3D Button Visual Editor you can load and save 3D control templates.
| • | Load template: this menu item will give you the possibility to browse a previously saved 3D template containing the settings to apply to the control |
| • | Save template: this menu item will give you the possibility to save the current control settings into a Normal 3D template file for future uses |
| • | Save Extended template: this menu item will give you the possibility to save the current control settings into an Extended 3D template file for future uses |
for details about the creation and use of 3D templates check the How to manage 3D control templates tutorial.
Editing multiple controls at once
An application User Interface very often requires several buttons to have the same 3D settings, just see the image below displaying a virtual telephone keypad originally designed using the default settings of our Ctl3dPushButton:
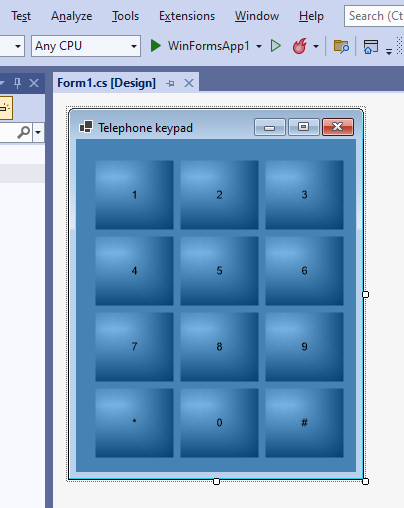
now we want to change the 3D buttons appearance in order to give them an outstanding look but we don't want to edit the same settings for each of them because it would require too much time we could use for more productive tasks; to save your time, follow the steps below:
| • | Select button with caption "1" and edit its settings using the Visual Editor as explained inside the previous section then, before closing the Visual Editor, save current settings inside a Normal template file; the result could be like in the image below: |

| • | Now we must apply the setting used for button "1" to all of the other buttons: select all the remaining buttons as displayed below (you can select more than one button clicking on each button surface while holding the CTRL key pressed); be sure that the container form is not selected together with the buttons. |

| • | Now go to the "Properties" pane and locate the property named LoadTemplateFile as displayed below: |

| • | Inside this property you can manually enter the previously saved Normal template file or, for your convenience, you can browse it clicking the |
| • | Once the 3D template will be selected the form will appear like this: |
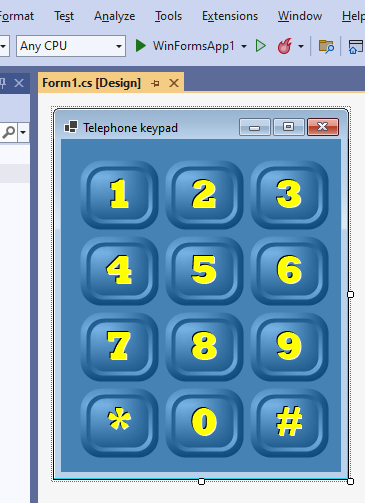
| • | That's all: at this point there are a couple of things to remark: |
1- The loading of the 3D template will not affect the caption text of the buttons but only its settings.
2- If all of these buttons will have the same size, the caching system will speed up the form rendering at Runtime: for further details about the caching system implemented inside our control, take a look to the How to speed up buttons rendering section.