|
How to port existing projects developed using version 1.0 or 2.0 |
  
|
|
How to port existing projects developed using version 1.0 or 2.0 |
  
|
IMPORTANT: Before starting the porting of a project, we always recommend to make a backup copy, just in case.
|
Porting a project that needs to embed a new version of a certain .NET component can sometime cause unwanted headaches: here follows some scenario that could be of interest for your porting: each scenario contains a step-by-step procedure you need to follow in order to port our component successfully.
Project developed using Visual Studio.NET 2005
Project developed using Visual Studio.NET 2005
1. Uninstall version 1.0 or 2.0 of 3D Control Magic from your development PC
2. Install the latest version of 3D Control Magic on your development PC
3. Open your project in Visual Studio.NET 2005
4. Open a form containing our component in [Design] mode (no need to make modifications at this time)
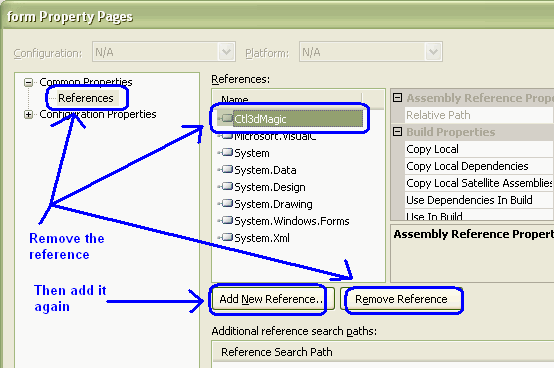
5. From the IDE menu, select "Project/References" and manually remove the existing reference to Ctl3dMagic as shown in "Image A" below
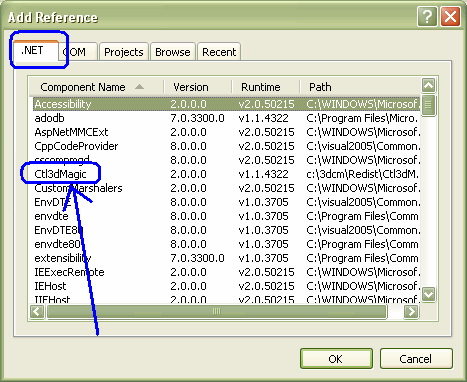
6. Insert again the reference to Ctl3dMagic as shown in "Image B" below
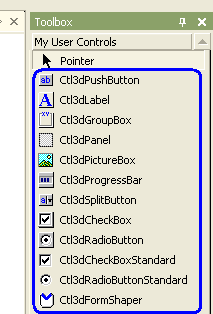
7. On the IDE Toolbox, manually remove the controls inserted by our component (see "Image C" below)
8. Insert the controls again (right click the Toolbox area and select "Choose items..." for this purpose)
9. Close Visual Studio.NET 2005 and answer "Yes" when asked if you want to save the modified project (it's important that you close the IDE and not the project only)
10. Launch again Visual Studio.NET 2005 and open your project
11. Open a form containing our component in [Design] mode
12. Right click one single instance of our component on this form and select "Properties" from the context-menu (note that one single instance will be enough for porting all of the other instances).
13. Click the "OK" button on the properties form
14. Save the form and close it
15. Repeat points from 11 to 14 for each of the other forms containing our component.
16. Rebuild your project
Porting of a project developed using Visual Studio.NET 2002 and 2003 into a Visual Studio.NET 2005 (or higher) project
1. Uninstall version 1.0 or 2.0 of 3D Control Magic from your development PC
2. Install the latest version of 3D Control Magic on your development PC
3. Open your project in Visual Studio.NET 2005 (or higher)
4. Execute the Wizard that will automate the porting of your project from previous version of Visual Studio.NET
5. Open a form containing our component in [Design] mode (no need to make modifications at this time)
6. Inside the project References, manually remove the existing reference to Ctl3dMagic as shown in "Image A" below
7. Insert again the reference to Ctl3dMagic as shown in "Image B" below
8. On the IDE Toolbox, manually remove the controls inserted by our component (see "Image C" below)
9. Insert the controls again (right click the Toolbox area and select "Choose items..." for this purpose)
10. Close Visual Studio.NET 2005 (or higher) and answer "Yes" when asked if you want to save the modified project (it's important that you close the IDE and not the project only)
11. Launch again Visual Studio.NET 2005 (or higher) and open your project
12. Open a form containing our component in [Design] mode
13. Right click one single instance of our component on this form and select "Properties" from the context-menu (note that one single instance will be enough for porting all of the other instances).
14. Click the "OK" button on the properties form
15. Save the form and close it
16. Repeat points from 12 to 15 for each of the other forms containing our component.
17. Rebuild your project
Image A

Image B

Image C
