|
How to configure the waveform analyzer through the visual editor |
  
|
|
How to configure the waveform analyzer through the visual editor |
|
Inside the How to add the component to your projects tutorials we have seen how to edit the control at Design-time; when editing a control at Design-time, you must take care of applying all of the settings that will influence the control behaviour at Runtime: for example, our waveform analyzer can change its colors, the font used to display the horizontal and vertical rulers, the rendering of scrollbars and so on: usually, in order to see these changes, you will have to compile and run your projects in order to see if settings modified at Design-time are correct for your needs: with our component we have found the right solution to let you verify, at Design-time, the behaviour that the control will have at Runtime: the solution is the integration of this component with our Waveform Analyzer Visual Editor application.
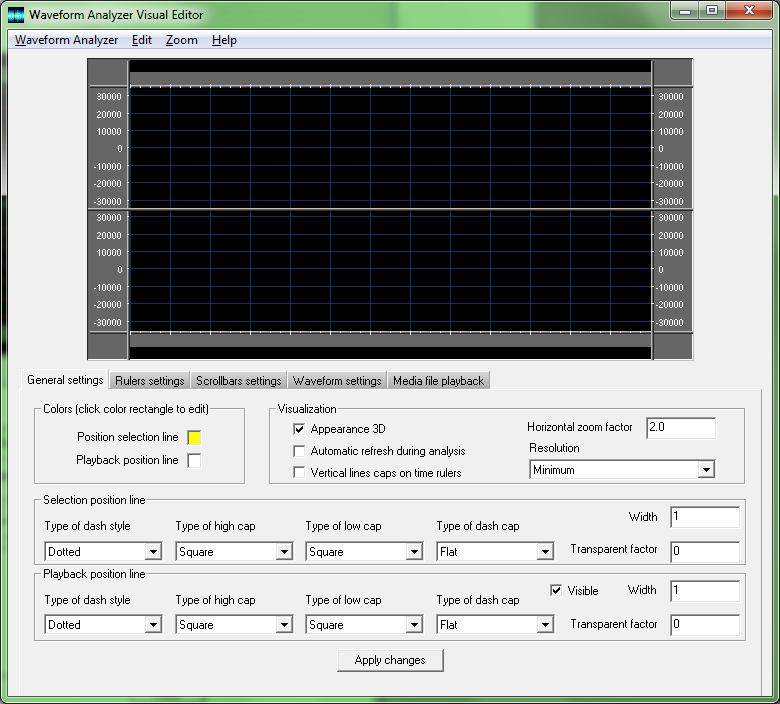
Waveform Analyzer Visual Editor is a WYSIWYG application and, as you can see on the image above, its user interface is very friendly and doesn't require any specific skill.
On the upper half of the user interface is displayed an empty instance of the waveform analyzer having the same dimensions set at design-time inside the development environment; on the lower half of the user interface there is a property sheet with various property pages, each addressing a set of specific settings applied to the waveform analyzer:
| • | The "General settings" property page, visible on the screenshot above, covers settings available inside the WANALYZER_GENERAL_SETTINGS data structure which are usually applied at runtime through the SettingsGeneralSet method. |
| • | The "Rulers settings" property page covers settings available inside the WANALYZER_RULERS_SETTINGS data structure which are usually applied at runtime through the SettingsRulersSet method. |

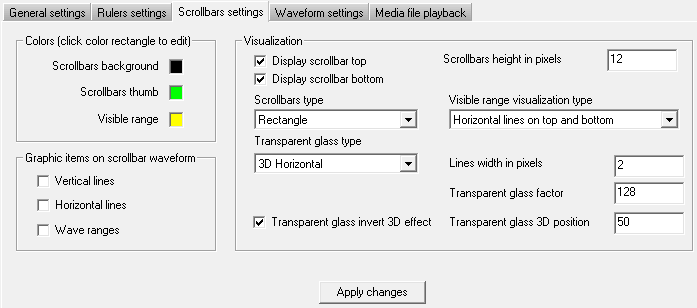
| • | The "Scrollbars settings" property page covers settings available inside the WANALYZER_SCROLLBARS_SETTINGS data structure which are usually applied at runtime through the SettingsScrollbarsSet method. |
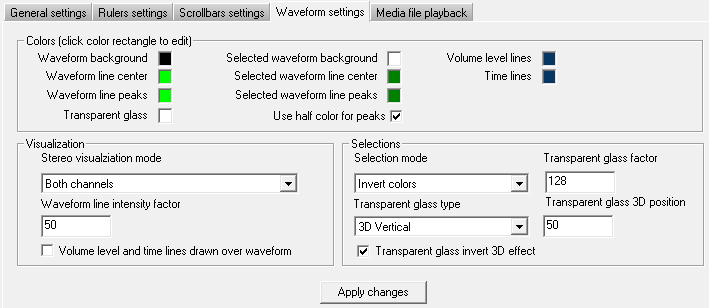
| • | The "Waveform settings" property page covers settings available inside the WANALYZER_WAVEFORM_SETTINGS data structure which are usually applied at runtime through the SettingsWaveSet method. |
In all of the property pages above, modifications will take effect by clicking the "Apply changes" button.
As mentioned above, the waveform analyzer will initially result empty because no media file is loaded by default: in order to allow simulating the real behaviour in presence of a loaded media file, the "Media file playback" property page allows loading and analyzing the waveform of a media file, with the possibility to start playback and observe how the control will behave on the user interface of your application.
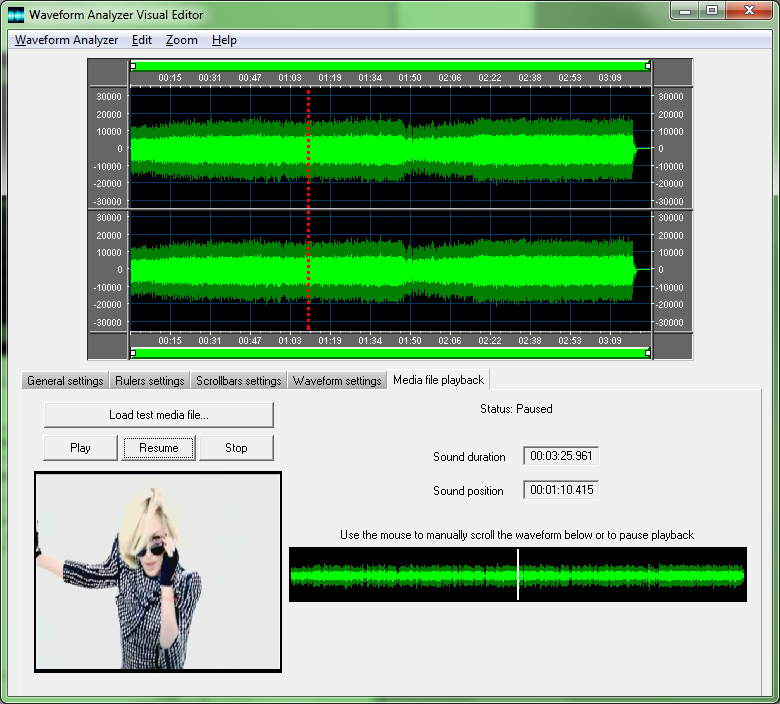
Due to the fact that the Waveform Analyzer control doesn't come with media playback support, loading of the media file for playback purposes is performed through the usage of DirectShow so, in case the loaded media file should contain a video track and the system should have the appropriate DirectShow codecs installed, it will be rendered as well inside the provided window.
At this point It must be remarked that this application can work in 2 modes:
From the IDE of the development environment
When invoked from the IDE at Design-time, the user interface will be exactly as seen on the screenshots displayed above: in case the control under editing should have been already modified through a previously editing session, current settings would be automatically visible.
When all of the needed changes have been applied, you can transfer the updated settings to the control under editing inside the development environment by selecting the "Waveform analyzer/Exit and save" menu item or by closing the visual editor through the "X" button on the caption bar as seen inside the screenshot below:
 :
:
During the usage of the visual editor, the following menu items could be selected:
Menu item |
Submenu item |
Usage |
Runtime equivalent method |
Waveform Analyzer |
|||
Reset settings |
Resets all of the waveform analyzer settings |
||
Load settings... |
Loads waveform analyzer settings from a previously saved XML configuration file |
||
Save settings... |
Saves current settings of the waveform analyzer under editing into a XML configuration file |
||
Load test media file... |
Loads a media file for testing purposes |
None |
|
Close test media file |
Closes a loaded test media file |
None |
|
Exit and save |
Closes the visual editor and passes current settings of the waveform analyzer to the control under editing inside the IDE. |
None |
|
Exit without saving |
Closes the visual editor and discards any eventual modification of settings applied to the waveform analyzer. |
None |
|
Edit |
|||
Select all |
When a media file is loaded, selects the full waveform |
SetSelection with parameters set to BOOL_TRUE,0 and -1 |
|
Remove selection |
Removes an existing selection |
SetSelection with parameters set to BOOL_FALSE,0 and -1 |
|
Zoom |
|||
Zoom to selection |
If a selection is available, changes the visible range by zooming into the selection |
||
Zoom to full waveform |
If the visible range doesn't cover the full waveform, zooms the visible range out in order to display the full waveform representation into the visible area |
||
Zoom in |
Zooms in the waveform representation allowing to display a smaller sound range into the visible area |
||
Zoom out |
Zooms out the waveform representation allowing to display a larger sound range into the visible area |
When the visual editor application is launched as a stand alone application, meaning that it's not launched from the IDE of the development environment, it allows doing some more operation which would not make much sense at design-time.
For example you may need to load a specific media file and mark certain points of the media file by adding some graphic item, for example one or more vertical and/or horizontal lines or put in evidence a specific portion of the loaded media file by changing the colors of a certain range of the waveform. In this situation, after having loaded the media file, the application allows adding graphic items and save them inside XML files that could be stored inside a database and retrieved at runtime in order to display them on the waveform analyzer when the same media file is analyzed.
For details about the usage of graphic items at runtime through code, see the How to add graphic items to the Waveform Analyzer tutorial.
As you can see on the screenshot below, the application's menu adds one further menu item named "Graphic items":

During the usage of the visual editor, the following menu items could be selected:
Menu item |
Submenu item |
Usage |
Runtime equivalent method |
Waveform Analyzer |
|||
Reset settings |
Resets all of the waveform analyzer settings |
||
Load settings... |
Loads waveform analyzer settings from a previously saved XML configuration file |
||
Save settings... |
Saves current settings of the waveform analyzer under editing into a XML configuration file |
||
Load test media file... |
Loads a media file for testing purposes |
None |
|
Close test media file |
Closes a loaded test media file |
None |
|
Exit |
Closes the visual editor. |
None |
|
Edit |
|||
Select all |
When a media file is loaded, selects the full waveform |
SetSelection with parameters set to BOOL_TRUE,0 and -1 |
|
Remove selection |
Removes an existing selection |
SetSelection with parameters set to BOOL_FALSE,0 and -1 |
|
Graphic items |
|||
Add Vertical line... |
Opens a dialog box which allows adding a new vertical line to the displayed waveform at a given position and with custom parameters. |
||
Add Horizontal line... |
Opens a dialog box which allows adding a new horizontal line to the displayed waveform at given positions and with custom parameters. |
||
Add Wave range... |
Opens a dialog box which allows adding a new waveform range to the displayed waveform at given positions and with custom parameters. |
||
Load from file... |
Allows loading graphic items previously stored inside a XML file |
||
Save to file... |
Allows saving currently displayed graphic items inside a XML file for later usage |
||
Show vertical lines |
Shows/hides eventual vertical lines added to the waveform |
GraphicItemsTypeShow with nType parameter set to GRAPHIC_ITEM_VERTICAL_LINE |
|
Show horizontal lines |
Shows/hides eventual horizontal lines added to the waveform |
GraphicItemsTypeShow with nType parameter set to GRAPHIC_ITEM_HORIZONTAL_LINE |
|
Show wave ranges |
Shows/hides eventual wave ranges added to the waveform |
GraphicItemsTypeShow with nType parameter set to GRAPHIC_ITEM_WAVE_RANGE |
|
Remove all |
Removes all of the added graphic items |
GraphicItemRemove with nUniqueId parameter set to -1 |
|
Zoom |
|||
Zoom to selection |
If a selection is available, changes the visible range by zooming into the selection |
||
Zoom to full waveform |
If the visible range doesn't cover the full waveform, zooms the visible range out in order to display the full waveform representation into the visible area |
||
Zoom in |
Zooms in the waveform representation allowing to display a smaller sound range into the visible area |
||
Zoom out |
Zooms out the waveform representation allowing to display a larger sound range into the visible area |
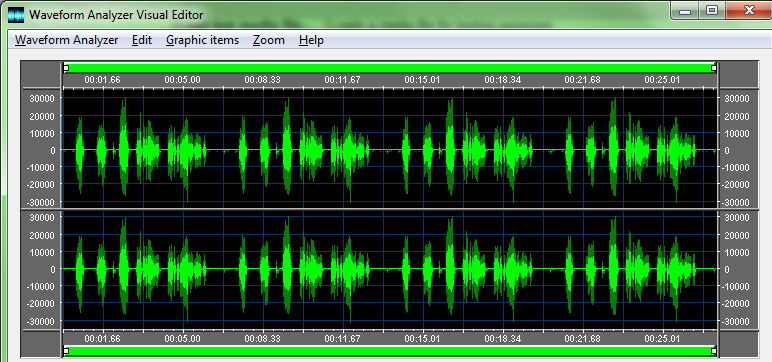
On the screenshot below you can see a waveform analyzer displaying a simple stereo waveform
while on the screenshot below you can see the same simple waveform with a set of graphic items added manually or by loading a previously saved XML file:
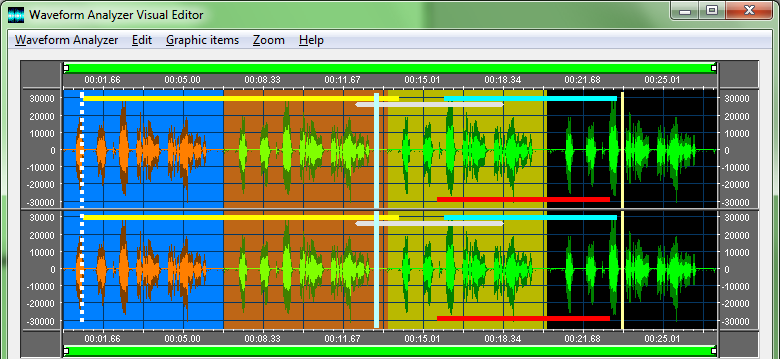
as you can see, several graphic items have been added and allow marking specific positions on the waveform. Once added to the waveform analyzer, graphic items can still be modified, for example you may need to modify the position or change some parameter like colors or drawing mode. This can be done by positioning the mouse over the graphic item and by clicking the right mouse button in order to display the context menu as seen on the screenshot below:
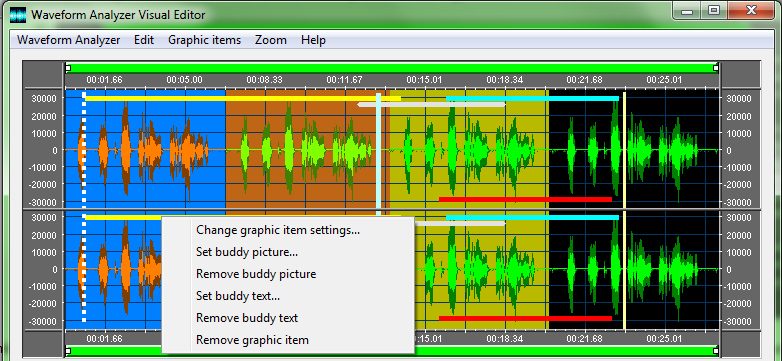
Items of the mentioned context menu:
Context menu item |
Usage |
Runtime equivalent method |
Change graphic item settings... |
Opens a dialog box which allows modifying settings of the selected item |
GraphicItemVerticalLineParamsSet for vertical lines, GraphicItemHorizontalLineParamsSet for horizontal lines and GraphicItemWaveRangeParamsSet for wave ranges |
Set buddy picture... |
Opens a dialog box which allows adding or modifying a buddy picture of the graphic item |
A buddy picture can be added through the GraphicItemBuddyPictureSetFromFile, GraphicItemBuddyPictureSetFromMemory, GraphicItemBuddyPictureSetFromHandle methods and related parameters modified through the GraphicItemBuddyPictureParamsSet method |
Remove buddy picture |
Removes an eventual buddy picture |
GraphicItemBuddyPictureSetFromFile with the strPathname parameter containing an empty string |
Set buddy text... |
Opens a dialog box which allows adding or modifying a buddy text of the graphic item |
A buddy text can be added through the GraphicItemBuddyTextSet method and related parameters modified through the GraphicItemBuddyTextParamsSet method |
Remove buddy text |
Removes an eventual buddy text |
GraphicItemBuddyTextSet with the strText parameter containing an empty string |
Remove graphic item |
Removes the graphic item from the waveform |
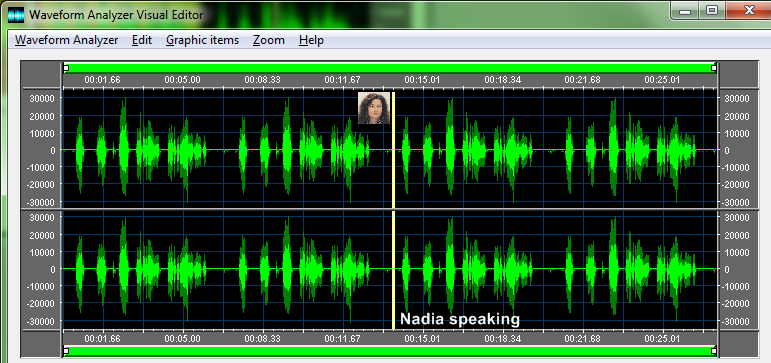
Below you can see a yellow vertical line having both a buddy picture and a buddy text at different positions.
As mentioned before, after adding and modifying graphic items, the "Graphic items/Save to file..." menu item allows saving all of them inside a XML file for later usage at runtime or during another session of the visual editor launched in stand alone.