|
How to use the Automatic Fader |
  
|
|
How to use the Automatic Fader |
  
|
The embedded Automatic Fader can easily manage the cross-fading between two songs loaded inside two different players (also know as "decks"): the Fader object, internally implemented as a COM object, is dedicated to this purpose and can be accessed through the control's Fader property.
When you need using the Fader object inside your development, you need to initialise it through a call to the Fader.Init method, passing the fading type (playlist based or single song based) and the two involved players identifiers.
The fading type can be:
| • | single song based: In this case the cross-fading between the two involved players is performed through the respective loaded songs. |
| • | double playlist based: In this case the cross-fading between the two involved players is performed getting sounds from the respective loaded playlists. |
| • | single playlist based: In this case the cross-fading between the two involved players is performed getting sounds from the playlist loaded inside one single player: the specific player whose playlist will be used can be set through a call to the Fader.PlayListUseSingle method. |
IMPORTANT NOTE ABOUT USAGE OF VIDEO CLIPS: when using video clips in conjunction with the automatic fader, it's recommended avoiding the usage of more than one output window for each player or on slower PCs you may experience some audio stuttering during the fading between the two involved players.
|
Fading types described above can be started through a call to the Fader.StartManualFading method and, if needed, stopped through the Fader.Stop method: by default the multimedia engine will check the availability of at least two songs or video clips having a duration longer than the total mixing time: without this availability the multimedia engine will return error ERR_CANNOT_FADE_SMALL_SONGS (-45); this behaviour can be modified by setting the Fader.CheckItemsDurationOnStart property to "False".
Once the Fader object has been initialized you can configure its behaviour through a set of dedicated properties that will manage the fade-in/fade-out transition.
As you can see on the graphic below, by default cross-fading is based upon a Time/Volume combination:
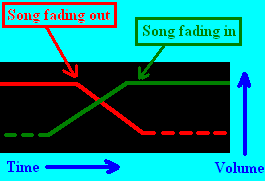
The target volume for fade-in is by default set to 100% (0 dB) but this can be modified using the Fader.FadeInTargetVolumeSet method.
We have also added a Time/Playback-rate combination that allows the creation of the so called "Breakdown effect" that simulates the switch off of the deck rotor engine: you can choose this behaviour through the following property:
The available properties are the following:
Fader.FadeStartFromEnd: expressed in milliseconds, determines when the fader will automatically start the cross-fading
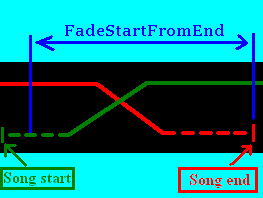
Fader.FadeOutLength: expressed in milliseconds, determines the duration of the fade-out phase
Fader.FadeInLength: expressed in milliseconds, determines the duration of the fade-in phase
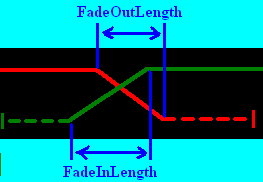
Fader.FadeInSeekPos: expressed in milliseconds, determines the initial position of the song fading-in: in case that the song fading-in is in "paused" state, this parameter is ignored and the actual position is taken.
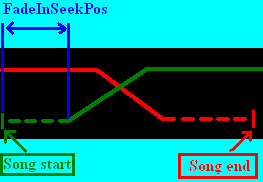
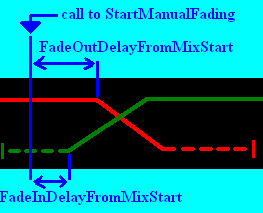
Fader.FadeOutDelayFromMixStart: expressed in milliseconds, determines the delay applied for the fade-out
Fader.FadeInDelayFromMixStart: expressed in milliseconds, determines the delay applied for the fade-in
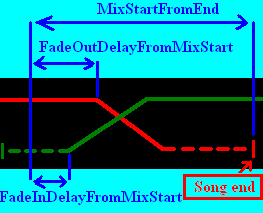
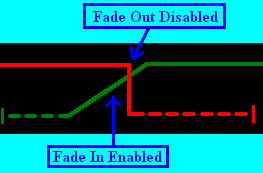
Fader.FadeInEnabled: boolean value that determines if the fade-in is enabled
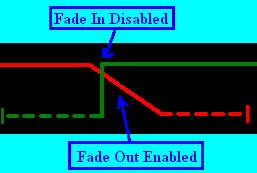
Fader.FadeOutEnabled: boolean value that determines if the fade-in is enabled
In case you should need to give the possibility to start a manual cross-fading, without the need to wait reaching the predisposed position, you can use the Fader.StartManualFading method.
The total time required for the cross-fading is immediately available inside the Fader.TotalMixingTime property (read-only).
If you need to disable the use of the Automatic Fader, you will have to call the Fader.Exit method that will remove the involved synchronisation; a new call to the Fader.Init method will enable again the Automatic Fader.
You can synchronize the container application with the cross-fading process catching a set of predefined events:
FadingPointReached: occurs when the playback of the song that will fade-out reaches the Fader.FadeStartFromEnd position
FadingVolumeChanged: occurs several times, for each of the involved players, during the volume sliding: allows to know in real-time the player's volume.
FadeInStarted: occurs when the song fading-in starts playing
FadeInCompleted: occurs when the fade-in is completed
FadeOutStarted: occurs when the song fading-out starts lowering its volume
FadeOutCompleted: occurs when the fade-out is completed
All of the graphics above show the volume fade as linear but the automatic fader can be also set to work with different kinds of volume curve as seen for volume automation.
Specific volume curves can be set through the Fader.FadeInVolumeCurveSet or Fader.FadeInVolumeCurveSetEx for fade-in and through the Fader.FadeOutVolumeCurveSet and Fader.FadeOutVolumeCurveSetEx for fade-out.
The control comes with a set of fixed curves and with the possibility to design custom curves based upon Bézier curves.
Linear curve
|
Exponential curve
|
Cosine curve
|
Smooth curve
|
Custom Bézier curve based upon two control points.
Custom curves can be designed directly inside the user interface of the container application through the VolumeAutomation.CurveDesigner property which implements the CurveDesignerMan class: this specific object manages a windowed control, whose visual aspect can be defined programmatically, which allows designing volume curves based upon Bézier curves whose shape is defined through the manual positioning of 2 control points (displayed in cyan color on the graphic above). For further information about the use of the embedded CurveDesigner refer to the tutorial How to create custom volume curves. |
The Fader.Display property
Another useful feature of the embedded Automatic Fader is the possibility to display its visual representation through the Fader.Display property that works in a way very similar to the other Visual Feedbacks: this property must be associated, through the call to the Fader.Display.Create method, to an existing window that will be used as a surface for the graphic rendering; below you can see a screenshot of our Demo application that shows it:
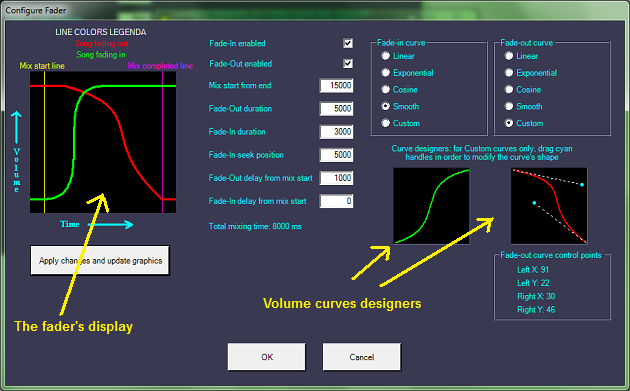
Note that also the Fader.Display property is internally implemented through the Fader.Display COM object, so you have full customization capabilities about the display coloring; here is the set of available properties and methods:
Fader.Display.ColorSongFadingOut: the color used to render the line representing the song fading-out
Fader.Display.ColorSongFadingIn: the color used to render the line representing the song fading-in
Fader.Display.ColorLineMixPoint: the color used to render the line representing the Mix point
Fader.Display.ColorLineSongEnd: the color used to render the line representing the end of the song fading-out
Fader.Display.ColorBackground: the color used to render the Display background
Fader.Display.WidthSongLines: the width in pixels of the song lines
Fader.Display.WidthReferenceLines: the width in pixels of the reference lines
Fader.Display.SetBackPictureFromFile: sets a background picture obtained from a BMP file
Fader.Display.SetBackPictureFromHandle: sets a background picture obtained from a bitmap handle
Below you can find a graphic that gives an idea of the involved elements:
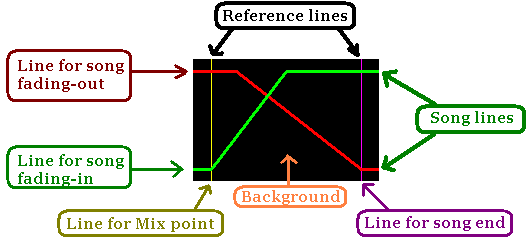
This graphic can be shown/hidden through the call to the Fader.Display.Show method.
A sample of use of the Fader object and of the Fader.Display object in Visual Basic 6 and Visual C++ 6 can be found inside the following sample installed with the product's setup package:
- Fader