|
Adding the API to a project targeting .NET 5, 6 or Core 3.1 |
  
|
|
Adding the API to a project targeting .NET 5, 6 or Core 3.1 |
  
|
After having installed the component inside the development PC through our setup program, you can add the component to a project targeting .NET 5, 6 and Core 3.1 versions by installing the proper NuGet package using the procedure described below:
| • | Open the project you are working on |
| • | Inside the "Solution Explorer" right-click the mouse button on the "Dependencies" item |
| • | From the context menu open the NuGet Package Manager by selecting the "Manage NuGet Packages ..." item |

| • | By default the NuGet Package Manager will browse packages available on the nuget.org server; although trial versions of our NuGet packages are available inside nuget.org, it's recommended using packages available inside the folder in which you installed any of our components: the default folder is "\Program Files\MultiMedia Soft" so you need to set the mentioned folder as a packages source through the NuGet Package Manager settings |
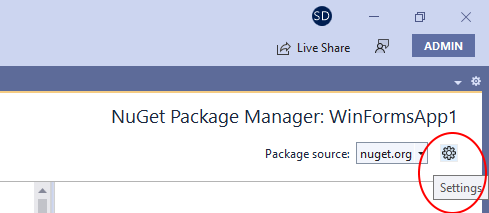
| • | On the settings form, select the "+" icon |
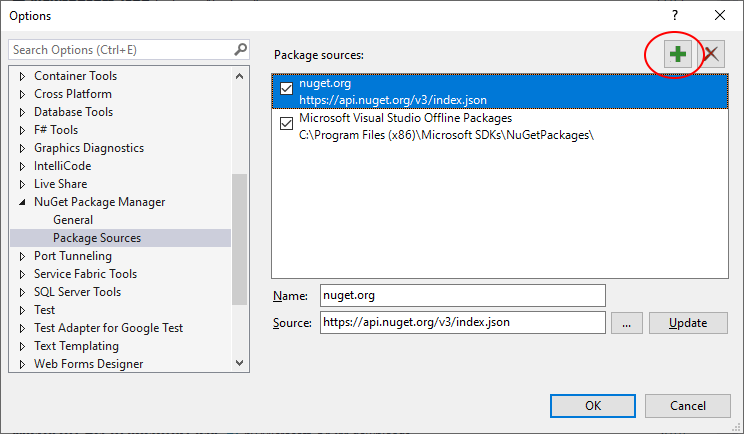
| • | A new default "Package source" is a automatically added as seen below |
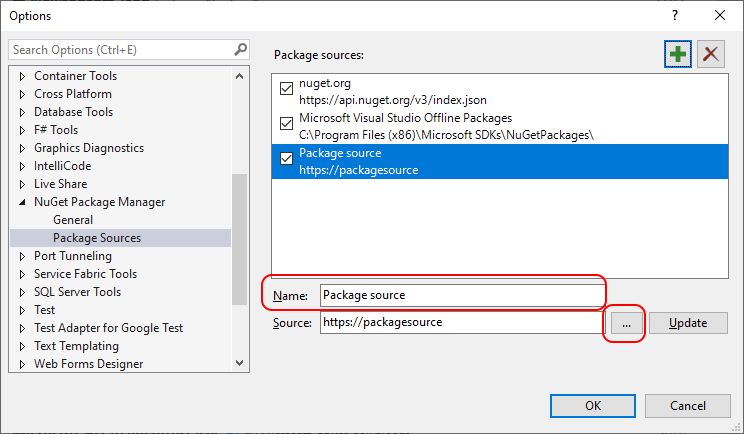
| • | On the "Name" field enter a string that would help identifying the source (we suggest entering "MultiMedia Soft Packages") |
| • | Click the "..." button and enter the path where our NuGet packages are installed (by default it should be "\Program Files\MultiMedia Soft\NugetPacks") |
| • | By clicking the "Update" button the form should finally look like this: |
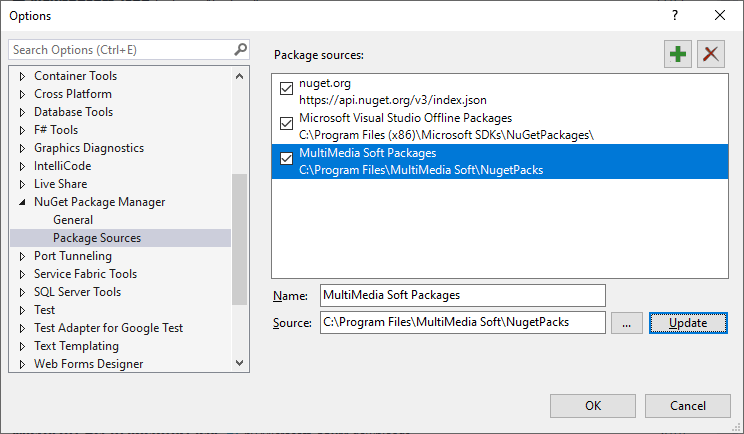
| • | Close the form by pressing the "OK" button |
| • | The new source could now be selected through the provided combo-box |
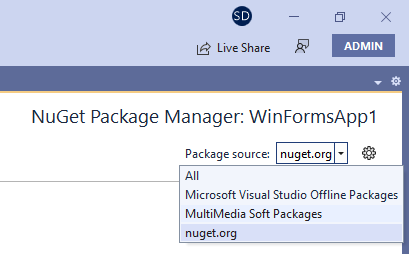
| • | Once selected, after clicking the "Browse" tab, all of the MultiMedia Soft NuGet packages installed on the development machine will be displayed (in this case a Trial version of the component) |
| • | In order to install the package inside the project, move the mouse of the right of the displayed version (circled in red below): this will cause an arrow to appear (circled in purple below): |

| • | Click the arrow in order to start the installation procedure |
| • | Once the installation procedure is completed, close the NuGet package manager |
| • | At this point the component is installed and you can start adding the needed code as explained inside the How to use the component in your projects tutorial |
The tutorial above is mostly related to the installation of the Trial version of the component; in case you should have already begun developing your application with the Trial version and at a certain extent you should decide to purchase the "Full" version, you would not have to restart your coding from scratch and you could simply upgrade using the appropriate NuGet package; below a simple sequence to perform this upgrade:
| • | Close any instance of Visual Studio |
| • | Uninstall the setup package of the Trial version from the "Apps" applet of the Windows settings |
| • | Download and install the Full version from our website using provided URL and credentials |
| • | Launch Visual Studio and open the project you were working on |
| • | Be sure to close the form containing the component |
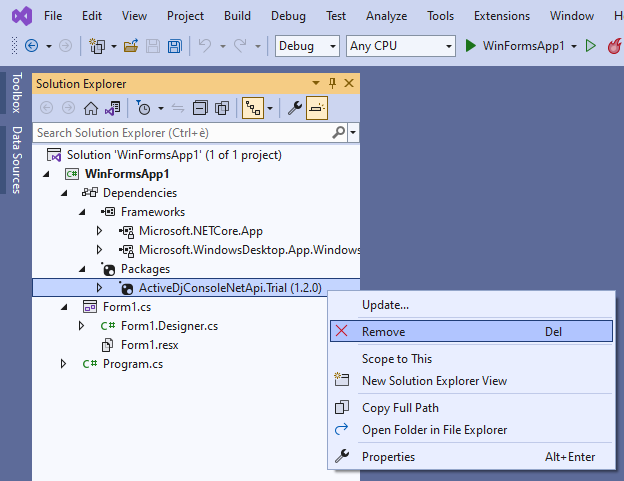
| • | Inside the "Solution Explorer" expand the "Dependencies/Packages" item |
| • | Right click the "ActiveDjConsoleNetApi.Trial" item and select the "Remove" menu item as seen below: |
| • | As explained above for the Trial version, open again the NuGet Package Manager and select the "MultiMedia Soft packages" source |
| • | Press the arrow for installing the Full version and finally close the NuGet Package Manager |

| • | The upgrade is now completed so you can go on with your development. |